


Mastering Screen Zoom on Your Mac
If you’re struggling with tiny text or intricate graphics on your Mac, zooming in can significantly enhance your viewing experience. Luckily, just a few simple adjustments to the settings can allow you to magnify content and achieve precise alignment for all your design tasks.
Your Mac offers a built-in zoom feature that enables you to enlarge the screen through either keyboard shortcuts or multitouch gestures on the trackpad. In this guide, we’ll explore how to utilize this feature effectively as well as discuss additional options like Hover Text and Display Scaling that can further improve visibility.
How to Activate Zoom on Your Mac
Apple is renowned worldwide for prioritizing accessibility across its products. For many users with low vision, having effective tools available is crucial—and macOS provides various solutions tailored for these needs.
- Activating Zoom in System Preferences
- Full-Screen and Split-Screen Zoom Options
- Picture-in-Picture Functionality
- Tweaking Additional Settings for Optimal Use
- The Benefits of Hover Text Feature
- Scaling Up Everything Displayed On-screen
Enabling Zoom via System Preferences
Your first step is checking whether the zoom function has already been activated. Access System Preferences (labeled as System Settings in later macOS versions) by selecting > System Settings from the menu bar.

You will find all relevant configurations under Accessibility > Zoom. Here’s where you can tailor how this feature works for you.
The first task is enabling the zoom option itself along with deciding which methods suit you best for triggering it. You have multiple choices:
- A less common keyboard shortcut: Option-Command-8.
- A double-tap gesture using two fingers on your trackpad will also activate it if enabled.
- You may prefer using Control while scrolling upwards or downwards on your mouse/trackpad to adjust magnification levels effortlessly.
Selecting Your Preferred Style of Magnification
You’ll need to determine which zoom style fits seamlessly into your workflow. Options include Full Screen, Split Screen, or Picture-in-Picture—each providing distinct advantages depending on how you typically engage with content throughout tasks like graphic design or document editing.
The Full-Screen Viewpoint: A Closer Look at Everything!
This setting enlarges everything across the entirety of your display; although it creates a more cohesive environment visually, users may feel disoriented when enlarging too much—a possibility that graphic designers commonly encounter during projects requiring precision alignment and detail inspection!
Diving into Split Screen: Enhanced Interaction Without Losing Track!
‘`
—
Mastering Display Zoom on Your Mac: A Guide
Understanding Split Screen Magnification
The Split Screen feature on your Mac conveniently enlarges the top section of your display while maintaining a standard view in the lower part. This function provides a unique experience similar to using bifocal lenses, allowing you to focus on specific details without losing sight of the broader context below. While some users might find this configuration challenging with default settings, this guide will help you customize it effectively.
Exploring Picture-in-Picture Mode
What is Picture-in-Picture?
The Picture-in-Picture (PiP) mode enables users to create a small, movable window that acts like a magnifying glass, trailing your Mac’s cursor. This innovative setting facilitates efficient reading of text segments or viewing images without monopolizing your entire screen.
Adjusting Your PiP Experience
With PiP activated, you have the option to resize and reposition the floating window according to your preferences. Simply click on “Size and Location” in the settings menu to preview how changes will look in real time. You can easily drag edges for resizing and adjust its position much like any ordinary application window—click “OK” once you’re satisfied with these adjustments.
Fine-Tuning Your Zoom Settings
Advanced Configuration Options
For those seeking greater personalization of their zoom experience, click on ‘Advanced’ within the zoom settings menu. Here you’ll discover an array of options that allow for meticulous customization tailored to fit your specific needs.
In addition to fine-tuning individual preferences within display zoom features like split screen and picture-in-picture modes, take advantage of customizing speed and responsiveness that significantly enhance usability based on what works best for you.
!Display Zoom Advanced Settings
By delving into these advanced tools available through macOS’s accessibility functions, users can optimize their workflow and streamline tasks more efficiently than ever before—ensuring comfort during extensive screen time sessions.
Whether you’re studying intricate documents or need precision while working with design software, mastering these display features can lead not just to increased productivity but also enhanced ergonomics during usage.
Feel empowered as you harness these powerful zoom capabilities designed specifically for maximizing clarity while keeping functionality at hand!
Enhancing Accessibility on Your Mac: A Comprehensive Guide
Adjusting Zoom Settings for a Personalized Experience
Adjust the behavior of the zoomed image to follow your cursor closely or require movement towards the screen’s edge for navigation. Personally, I prefer setting this option to “Continuously with Pointer” for seamless interaction.
To ensure text appears smooth and legible, one might consider enabling settings that enhance image quality. However, in my case, I typically utilize the Zoom function solely for precise graphic design tasks rather than reading purposes; thus, I opt to keep this feature disabled.
Quick Navigation with Keyboard Shortcuts
Within the Controls section of your settings, you can activate keyboard shortcuts that allow quick access to show the magnifier temporarily or adjust various settings on-the-fly.
If experiencing sudden shifts in focus while engaged in a task becomes jarring or confusing, consider reducing the Movement Speed for a calmer zooming experience.
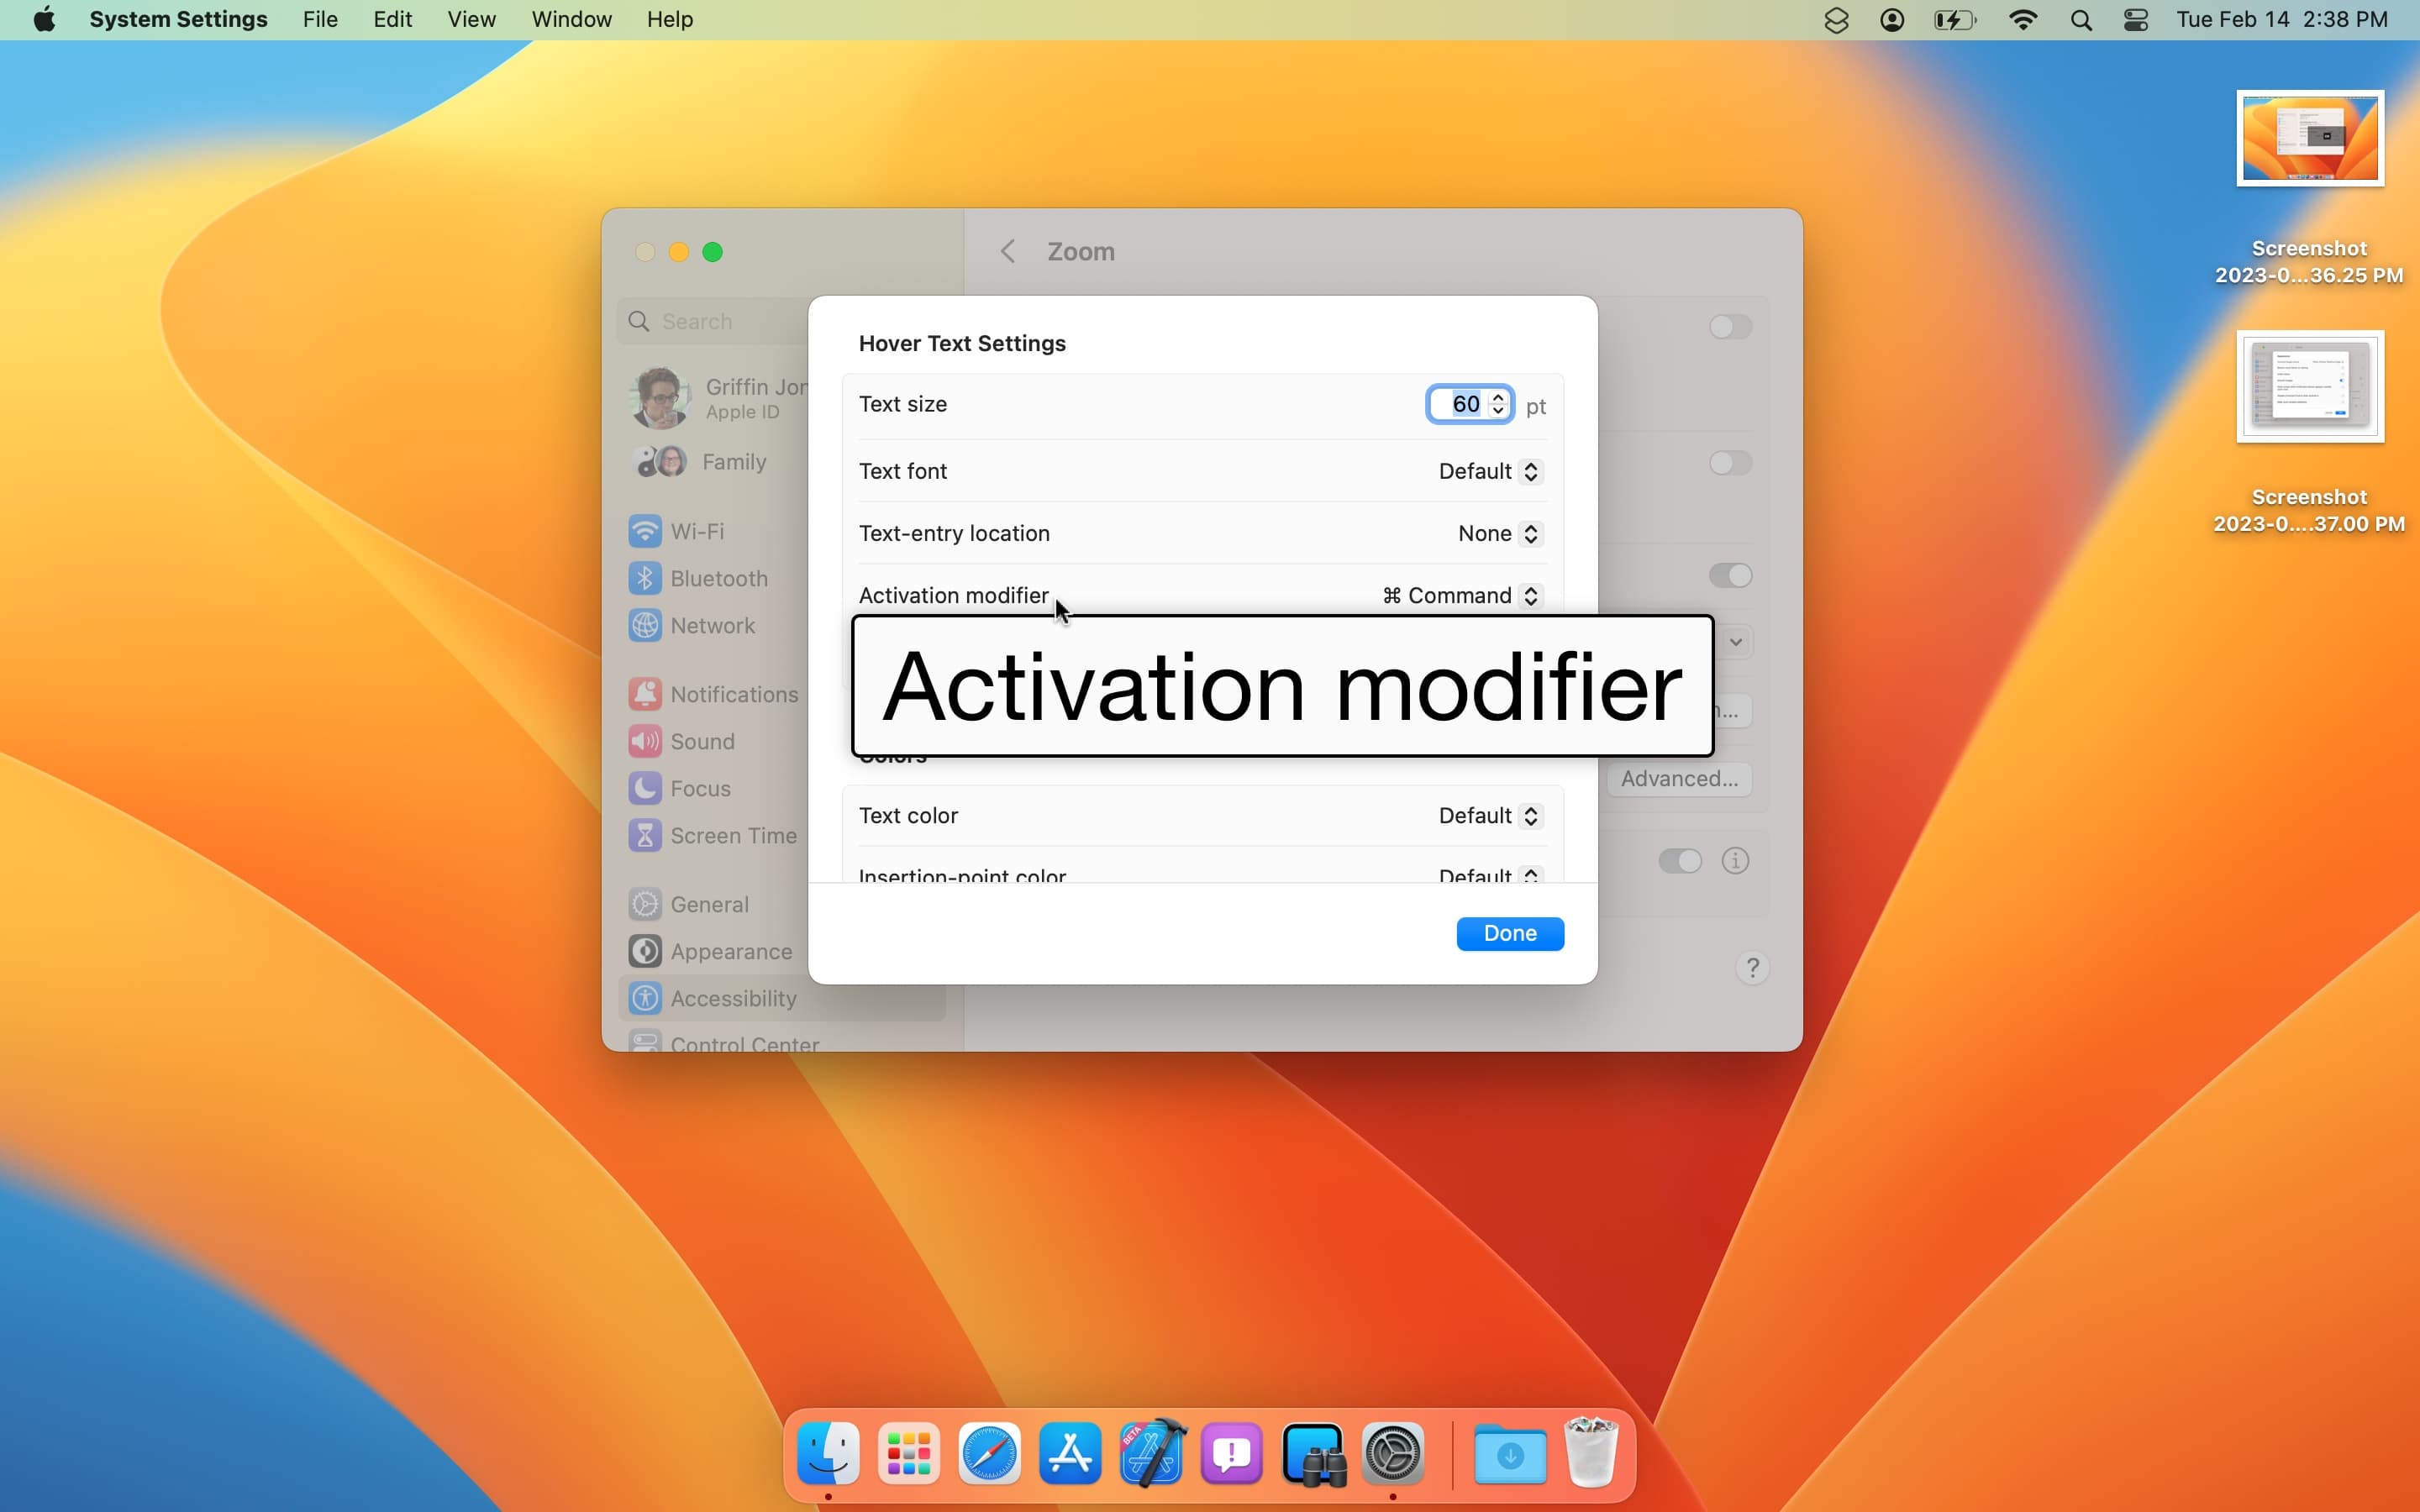
Discovering Hover Text: An Efficient Alternative
!Hover Text Feature
Hover Text provides instant magnification of any text displayed on your screen.
For those who primarily use their Mac’s zoom functionality for reading textures and controls, Hover Text might be an even more beneficial tool. By holding down the Command key (⌘), you can instantly view a large-scale preview of any text or interface element visible on your display.
Hover Text excels at providing enhanced clarity. If you’re uncertain about a particular button’s label within an application interface—no problem! This feature will reveal its name without hesitation. Moreover, it will indicate whether checkboxes are selected and remind users of both labels and current selections effortlessly. Apple has truly designed this feature with user experience in mind.
A simple click on ⓘ allows you to further customize aspects such as font size and style preferences as well as which key activates it—all tailored according to your needs!
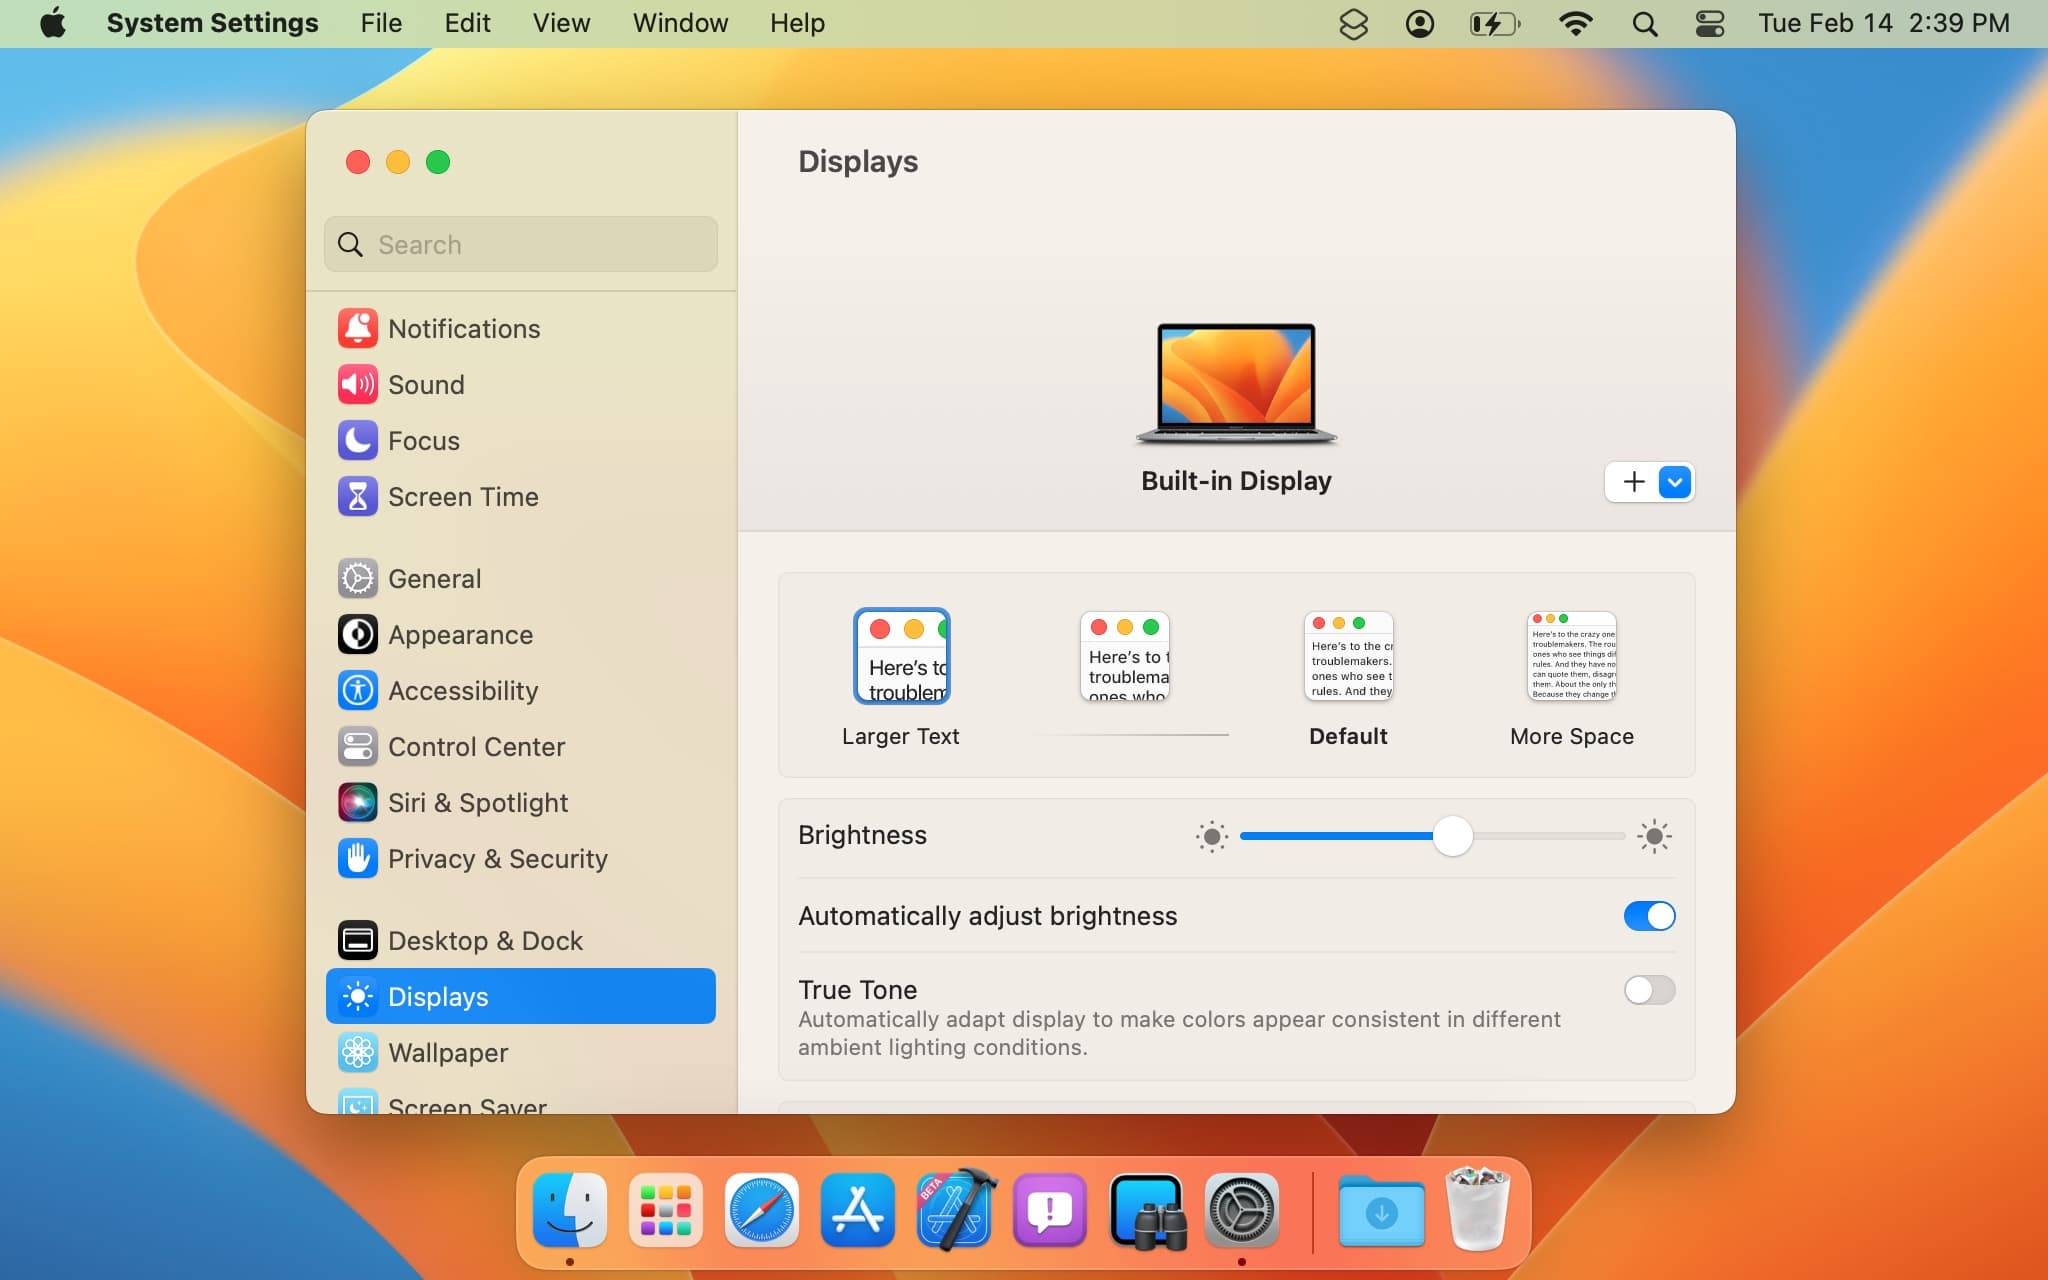
Embracing Display Scaling: Simplifying Visuals
!Display Scaling Options
Utilizing Display Scaling makes everything appear larger across your Mac screen.
While Zoom and Hover Text offer great functionalities, some users may find them unnecessarily complex when they simply want all elements enlarged seamlessly—by 25% perhaps?
Achieving this is straightforward! Navigate back to System Settings > Displays where multiple options will be available including Larger Text among others. Choosing one from these Larger Text selections provides an easy way to scale up every visible aspect across your screen without much hassle!
This solution is relatively permanent; changes remain until manually adjusted again via System Settings.
Exploring More Accessibility Features
Delve into additional accessibility tools available on Macs that cater specifically towards enhancing usability—including VoiceOver capabilities among others that support diverse user needs!
This guide was initially published discussing how users could optimize their zoom functionality last March 10th but has been refined with fresh updates reflecting current insights into maximizing accessibility features effectively!


