


Lock Your iPhone to One App Using Guided Access
Do you ever find yourself in a situation where you want to share your iPhone with a child or someone who might not respect your privacy? With the Guided Access feature, you can confine your device to a single application. Whether you’re allowing your kids to enjoy a game, sharing music with friends, or presenting a video, this feature prevents users from straying into your personal messages or making unexpected calls.
By accessing the Accessibility settings on your device, you can activate Guided Access. This function acts as an efficient ”guest mode,” ensuring that only one app remains accessible while restricting access to others.
This handy tool not only safeguards your phone but also preserves your privacy by giving you control over features such as volume buttons and time limits for app use.
Step-by-Step Guide: Using Guided Access on Your iPhone
Originally designed for increased accessibility, Guided Access provides users with the ability to restrict their devices to one specific app and selectively allow certain functionalities. It’s particularly useful when lending out your iPhone temporarily; it ensures the user cannot navigate away from the designated application.
This is just one of many accessibility functions available on Apple’s devices that can assist in various everyday scenarios. For example, beyond locking apps, features include text-to-speech options and managing multiple devices seamlessly—increased ease for both general usage and professionals alike.
Navigating Through Guided Access: The Basics
- Accessing it through Accessibility Settings
- Activating Guided Access
- Selecting Available Functions
- Dimming Specific Areas of the Screen
- Dismissing Guided Access Mode
- Tweaking Additional Options for Enhanced Usability
- A Overview of Additional Accessibility Features
Your Pathway to Activating Guided Access on Your Device


Dive into the guided setup by navigating from Settings > Accessibility > locate and select “Guided Access” (usually found at the end of options). Toggle on this feature so it’s ready when needed; however, remember that activation happens outside this menu—switching back to any app is necessary before initiating its use!
Your Activation Ritual: How To Start
Guided Acccess
The process involves subtlety; simply triple-clicking the side button may prompt additional options if other accessibility features are active. You’ll need then confirm with a passcode—please remember! Initiate by tapping “Start,” which directly locks down whatever screen is currently displayed while obscuring Home gestures along bottom navigation bars—an excellent way of containing interaction within bounds!
Select Accessible Functions Within The App
The beauty lies in customizability; before securing access fully within an environment artists or organizers may wish adjustments like blocking off sections where unintended actions occur—all achievable through touch settings existing within guided modes! That means smoother experiences tailored precisely towards end-user comfort levels!
Mastering the iPhone’s Guided Access: A Comprehensive Guide
Understanding Guided Access Features
Guided Access on your iPhone offers a robust way to restrict access, ensuring that users are limited to specific functionalities within apps. This feature is particularly beneficial when you want someone else to use your device without granting them full control.
Customization Options for Enhanced Control
Before initiating Guided Access, tap on Options in the lower-left corner of the screen. Here’s where you’ll find various features that can suit your needs:
- Disable Side Button: Prevents anyone from turning off the device or activating Siri accidentally.
- Enable Volume Buttons: Allows users to modify volume levels during their session.
- Disable Motion: Keeps the screen orientation fixed by turning off auto-rotation.
- Turn Off Software Keyboards: Stops any typing input from users.
- Deactivate Touch Controls: Users can only view content without interacting; swiping will be disabled.
- Set a Time Limit: Automatically locks down the app after a specified duration. This is useful for setting time limits on games, making it easier to manage equal turns for children.
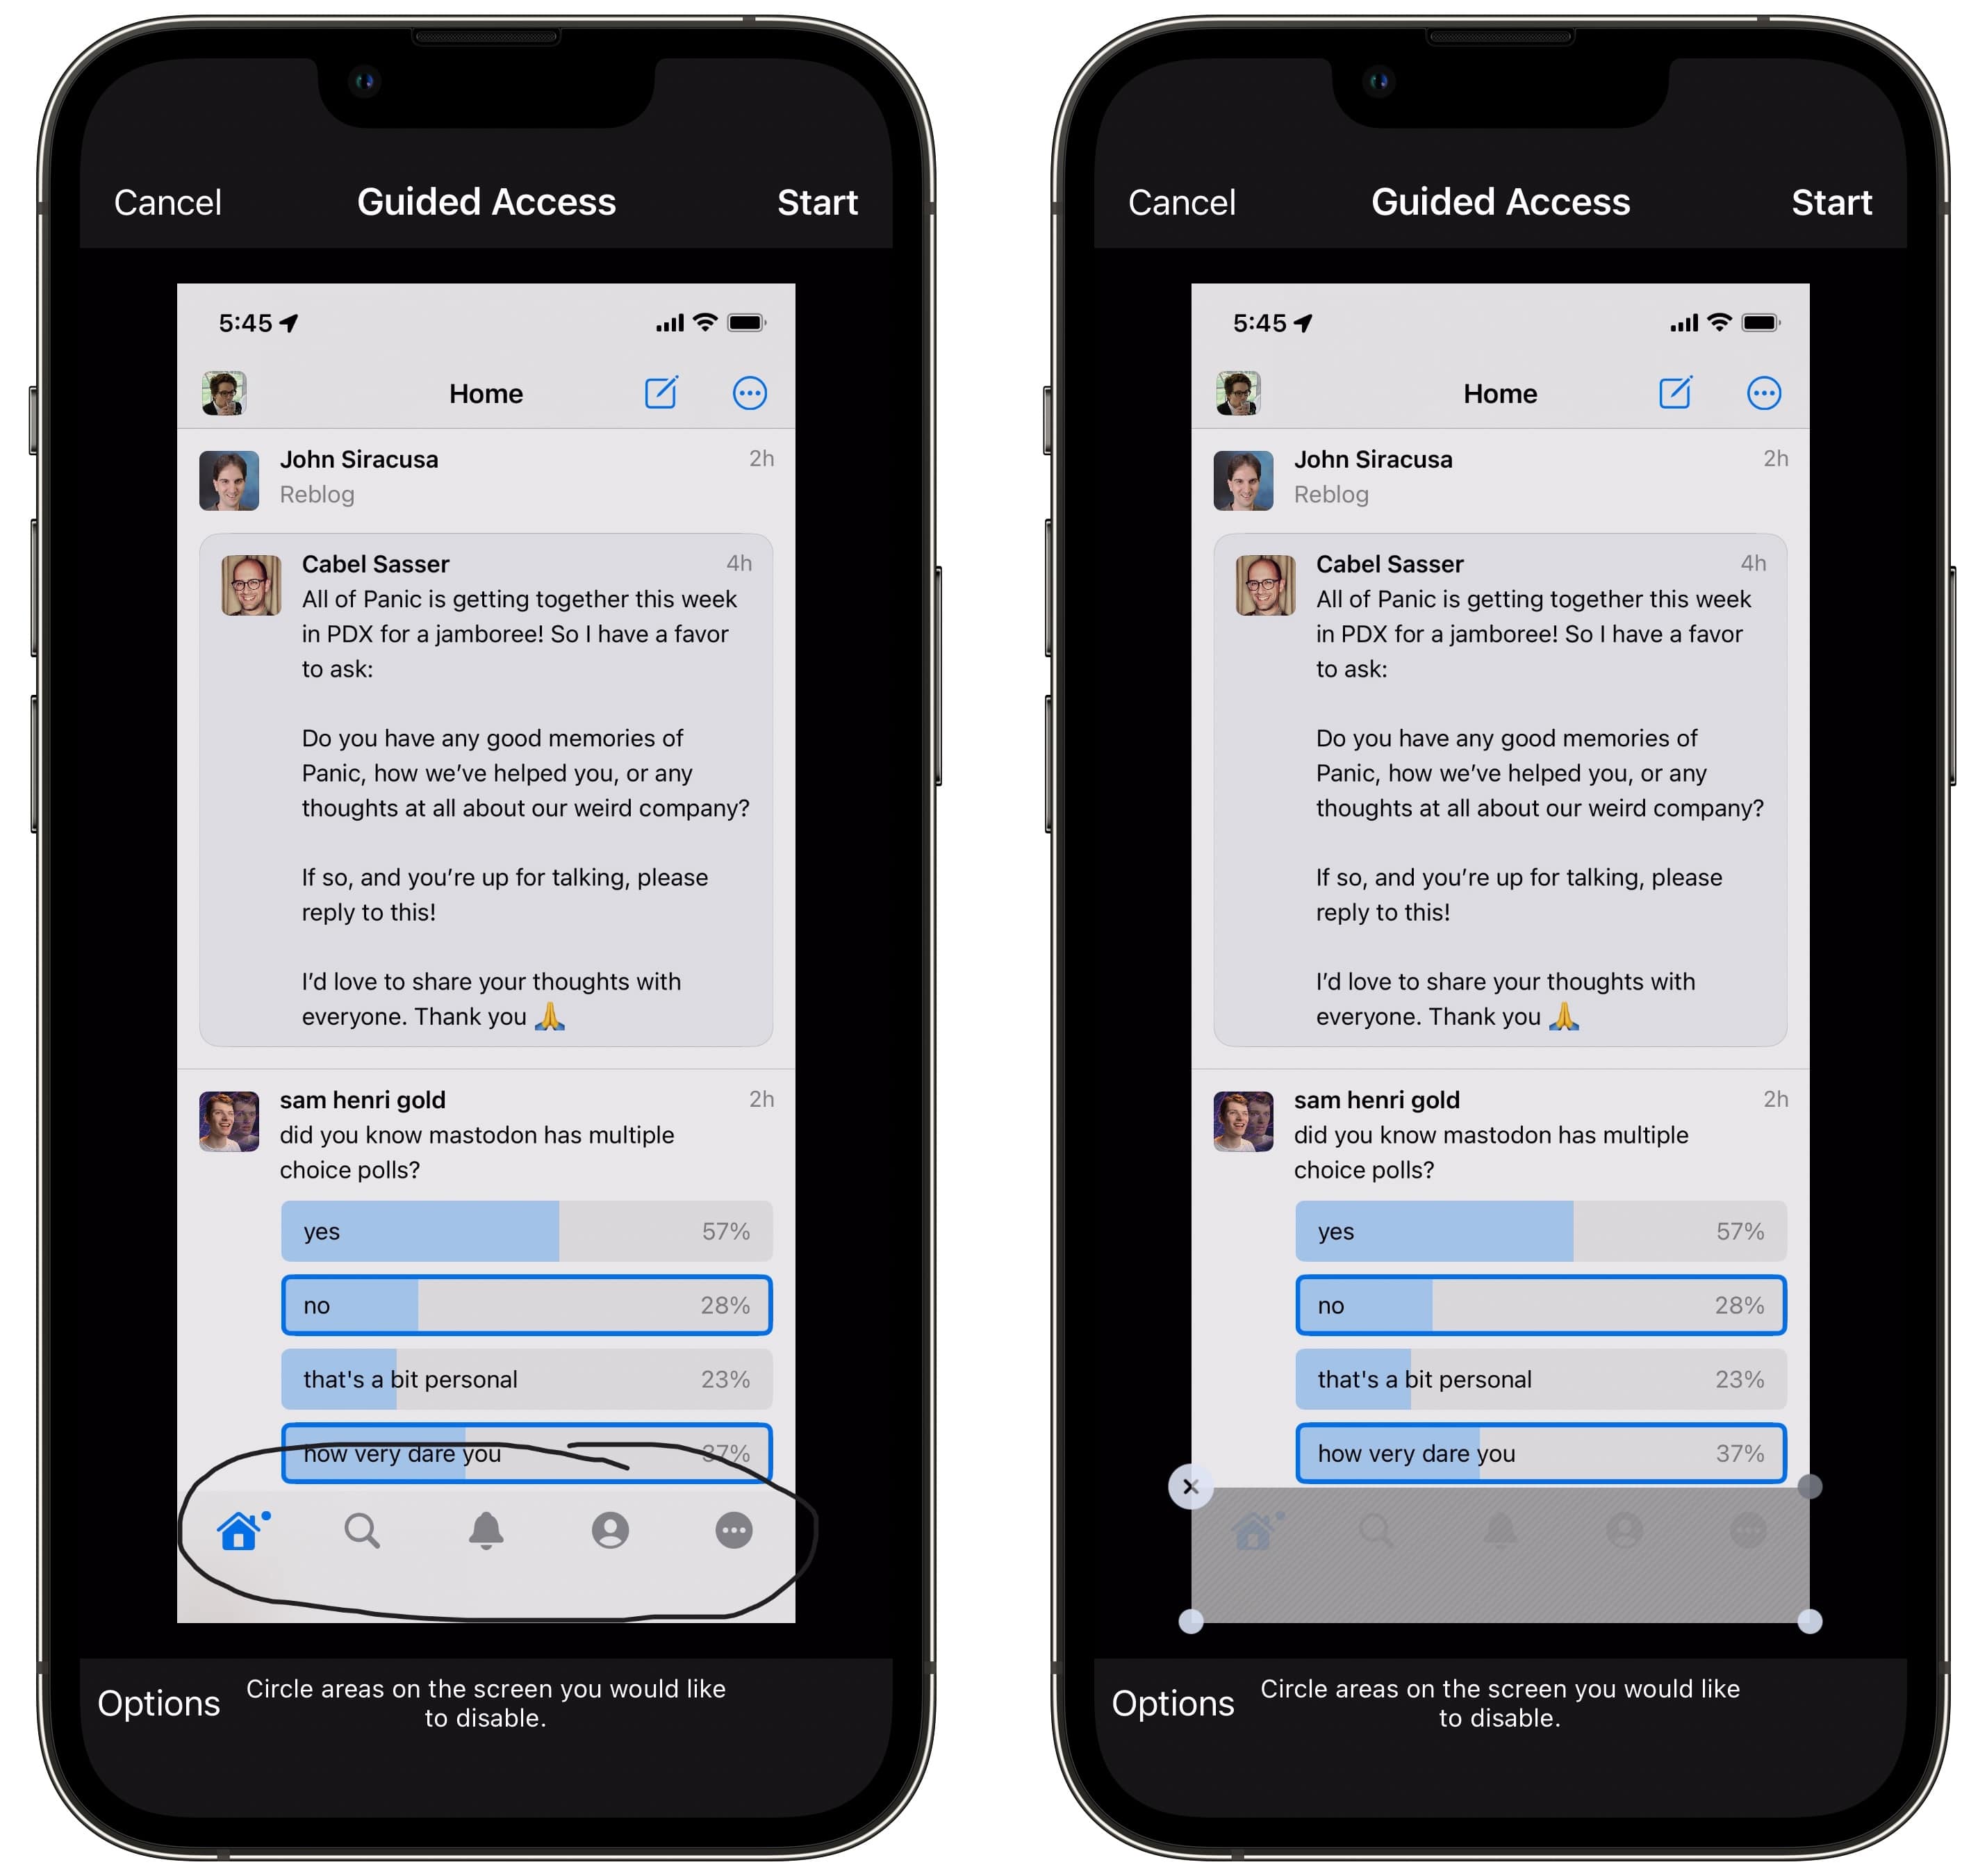
Block Specific Screen Areas
You might find it handy to block certain parts of the interface. For instance, if you’re entrusting someone with your music app but don’t want them delving into personal playlists or settings, this feature comes in handy.
Visual Restrictions Made Simple
To obscure parts of your display, simply draw a circle around areas you wish to block — such as navigation icons or function buttons. Doing so will create a translucent gray overlay that indicates these areas are inaccessible during use.
When guided access is active, these sections will be dimmed clear enough for anyone using the phone to see which functions they cannot access — not exactly subtle!
!Illustration of Blocking Screen Areas
Limitations in Functionality
However, it’s essential to note potential drawbacks with this option. Even if you’ve blocked certain functions visually (like directing friends exclusively towards particular songs), they may still bypass restrictions through gestures like swiping from edges or using other navigational methods.
Exiting Guided Access
When you’ve concluded monitoring or wish to re-establish full functionality on your iPhone:
- Triple-tap the Side button (or Home button).
- Enter your unique Guided Access passcode (it could differ from your main passcode) or utilize Face ID/Touch ID instead.
- Select ”End” at the top-left corner of the display; here’s also where modifications can be made regarding blocked regions during subsequent sessions.
Fine-Tuning Options for Optimal Use
For a seamless experience while utilizing Guided Access:
!Additional Features Screenshot
Exploring and adjusting settings allows you more granularity according to individual requirements and user scenarios—tailor each session distinctly based on who is accessing what functionalities within applications!
By mastering Apple’s Guided Access feature thoroughly through customization options and mindful restrictions over usage scenarios, maintaining control over who interacts with personal data and apps becomes manageable yet effective!
Enhancing Your iPhone Experience with Guided Access

Apple’s Guided Access feature is designed to help users maintain focus while using their devices by restricting access to certain applications and functions. It allows you to keep the screen active and set alerts when your session ends.
Tweaking Your Guided Access Settings
You can further customize your Guided Access experience by accessing additional settings. To do this, navigate to Settings > Accessibility > Guided Access where you’ll find a variety of options to refine your preferences.
Customizing Display Auto-Lock
The Display Auto-Lock option enables you to determine how long it takes for the screen to turn off automatically. This can be particularly useful when sharing your device for music control or as a remote for Apple TV, as it eliminates the need for constant unlocking if there are brief periods of inactivity.
Securing Passcode Preferences
You also have control over passcode settings, including whether Face ID or Touch ID can deactivate Guided Access. This could be especially beneficial in families where members might resemble each other closely enough that facial recognition becomes less reliable — unlike fingerprint recognition which can prove more challenging among similar-looking individuals.
Setting Time Limit Alerts
The Time Limits function lets you know when your allocated time is nearing its end. You can choose from various alert sounds or opt for voice notifications that will announce the impending time limit directly through your phone’s speaker.
Discovering More Accessibility Features
If you’re interested in exploring even more accessibility functionalities offered by Apple, be sure not to miss out on other features designed with user convenience in mind!