


Elevate Your iPhone Photography: Essential Tools and Techniques
The newest iPhone models come packed with advanced camera features that are sure to impress, such as Portrait Mode and Photographic Styles. However, if your focus is purely on the conventional photo mode, there are plenty of practical tools and settings available that can help enhance your images by employing classic photography techniques.


1. Harness the Rule of Thirds
The Apple Camera app has long offered various optional features designed to assist in capturing striking shots. The Grid feature stands out as a vital tool for applying the rule of thirds. It segments your image frame with two horizontal lines intersecting two vertical lines, effectively creating nine equal sections.

- Open Settings on your iPhone.
- Select Camera from the list.
- In “Composition,” toggle on the option for Grid.

Key Considerations When Using the Rule of Thirds:
- Identify Key Features: Determine which subjects or objects are focal points in your scene—this could be anything from people to architecture!
- Subject Placement: Arrange these elements along the grid lines or at their intersections; for example, position a person near one vertical line instead of centering them directly.
- Your Horizons Matter: If shooting landscapes, align horizons along one horizontal line; lower it if you want a dramatic sky or raise it for an expansive view of land/seas.
- Create Balance:If relying on asymmetry (e.g., placing something significant on one side), introduce secondary details across from it for balance.
- Dare to Experiment!The rule serves as guidance rather than law—inventively shift elements within frames to see how they redirect photo storytelling!
2. Keep Top-down Shots Level
If you’re capturing scenes from above—be it food platters or decorations laid out on tables—the built-in level indicator will be invaluable. This feature lets you ensure straight captures without needing external stabilizing devices like tripods! It’s also beneficial when photographing overhead subjects like ceiling fixtures or objects soaring in skies!

Mastering the Camera Level Tool on iOS 17
With the latest update in iOS 17, Apple has enhanced its camera functionality by introducing a standalone Level tool. This feature was formally part of the Grid overlay but is now easily accessible for precise photography. Here’s how you can utilize this great addition to improve your photos.
Activating the Camera Level Tool
To get started with using the camera level tool, you’ll first need to enable it in your settings:
- Access the Settings app on your iPhone.
- Navigate to Camera.
- Switch on the toggle next to Level.
Once activated, you’re ready to enhance your photographic skills!
Capturing Straight Shots with Precision
Open up your Camera application and select from modes such as Photo, Portrait, Square, or Time Lapse via the quick-access menu above the shutter button.
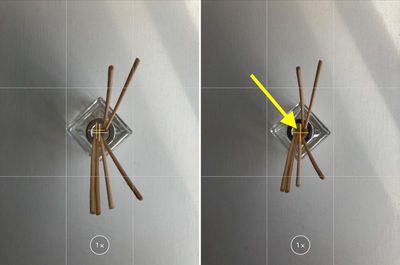
Aligning Your Shot
Position your phone directly above (or below) the subject you wish to photograph and adjust until you see a floating crosshair align with a fixed center crosshair displayed on-screen. When these two markers are perfectly aligned, both will light up yellow—a signal that you’re good to go! Tap on the shutter button and capture that picture-perfect moment.
Enhancing Horizontal Framing
iOS 17 further introduces an intuitive horizontal leveling feature for those traditional photographs where straight alignment is crucial. When this option is activated:
- A dashed line materializes across your screen if it detects a tilt when framing shots horizontally.
- The line appears white while misaligned but switches to yellow once you’ve achieved level positioning.
To test it out, open up your camera again and aim for an even shot—it prompts visual assistance so you’ll know when you’ve hit that perfect angle!
The leveling indicator works only within specific tilt ranges close to level orientation making sure it’s not distracting during angled shots.
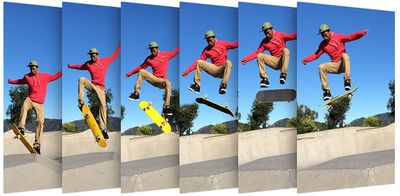
Leveraging Burst Mode for Action Shots
Burst Mode enables continuous shooting at ten frames per second—ideal for capturing fast-paced activities or spontaneous moments where timing is everything! This mode significantly increases your chances of getting just that right image amidst motion.
By holding down the shutter button while in Burst mode, let loose as many photographs as necessary until you’re satisfied—increasing possibilities of superb captures when action unfolds unexpectedly!
Incorporate these tools into your next photo outing for remarkably refined photography experiences! Whether aligning levels or rapidly capturing fleeting moments, mastering these features promises striking results every time you snap a photo with confidence.
Maximize Your iPhone Camera Experience: Essential Tips and Tricks
1. Capturing Fast Moments with Burst Mode
To utilize the Burst Mode feature on your iPhone, navigate to Settings > Camera, and enable the option for Volume Up as a trigger to take burst shots. When you’re in the Camera application, press and hold the Volume Up button to capture multiple photos rapidly. You’ll notice a counter appear within the shutter icon that increases as you continue pressing this button, showing how many images are being taken simultaneously. Release your finger from the button whenever you wish to stop capturing.
2. Adjusting Selfie Mirroring Settings
If you’re accustomed to seeing mirrored images of yourself in social media applications, taking selfies with your iPhone may sometimes be confusing since it automatically flips them horizontally during capture.

This behavior can result in an unexpected appearance in photos since many external apps already reflect this mirroring effect by default. Thankfully, there’s a way to modify this setting so that it aligns more closely with what you’re used to seeing.
Launch your Settings app, scroll down until you locate Camera settings then toggle on Mirror Front Camera.
Once completed, any new selfies captured will accurately reflect what appears on-screen before taking them—no more surprises!
3. Enhancing Composition with “View Outside the Frame”
If you’re using an iPhone 11 or newer model, there’s an advantageous feature called “View Outside the Frame.” This setting allows photographers to see beyond their selected photo’s frame while shooting—perfect for aligning pictures without needing post-capture edits like cropping.
Beneath the “Composition” section of your camera settings, activating “View Outside Frame” permits users to see additional areas captured by adjacent lenses when using either wide or telephoto options: when shooting zoomed-in shots via telephoto lens while viewing through ultra-wide if selected and vice versa for added perspective.
- Open Settings on your device.
- Select Camera from available options.
- Toggle View Outside Frame option ON under Composition settings.
Exploring the External World: Understanding Camera Lens Switching
Capturing moments can sometimes require a bit of experimentation, especially when it involves switching between different camera lenses. While you may need to adjust the zoom levels to facilitate this transition, there’s a clear indicator that the feature is operational: the camera’s display will become partially transparent. This allows you to view your environment beyond what is framed in your viewfinder.
The Importance of Environmental Awareness
When utilizing advanced photographic techniques, staying aware of your surroundings can significantly enhance creativity and safety. For instance, recognizing elements outside your immediate focus can inspire unique compositions or help avoid unexpected hazards while shooting in unfamiliar locales.
Pro Tips for Optimizing Lens Use
- Experiment with Zoom Levels: Each lens offers a distinct perspective; don’t hesitate to test various zoom levels to find what works best for each shot.
- Utilize Transparency Features: Take advantage of any visual aids provided by the camera interface that allow a glimpse into what’s surrounding you—this insight might lead to an innovative shot you hadn’t initially considered.
- Practice Regularly: Familiarity with how different lenses respond under varying conditions will boost both confidence and mastery over time.
embracing these features not only amplifies one’s photographic skills but also promotes an enriched experience while engaging with one’s environment through the lens of creativity.